Configure Connection
To create a connection to a remote computer, perform the following steps: On Remote Computer
- Grant required permissions (or skip this step if permissions were already granted)
- Restart the application to apply changes
- Allow upcoming connections on Remote Computer
- Copy Computer ID and PIN on Remote Computer
- Share computer ID and PIN with the person authorized to connect to your computer
On Local Host
- Grant required permissions (or skip this step if permissions were already granted)
- Restart the application to apply changes
- Connect to the remote computer from the local host using provided Computer ID and PIN
Initial Configuration on Remote Computer Running MacOs
By default, the Connect is launched in the Remote Control mode and is ready to connect to the remote computer using provided computer ID and PIN. But upcoming connections are disabled.

Upcoming connections are prevented.
Before you can start connecting to the remote computer, Connect instances should be installed on both computers. The computer should be turned on and connected to the internet and required permissions should be granted as described below. Unattended access is not supported by Connect for MacOS in case you are connecting to the computer running MacOS.
Required permissions should be granted on remote computer, and the remote computer should be configured to allow upcoming connections.
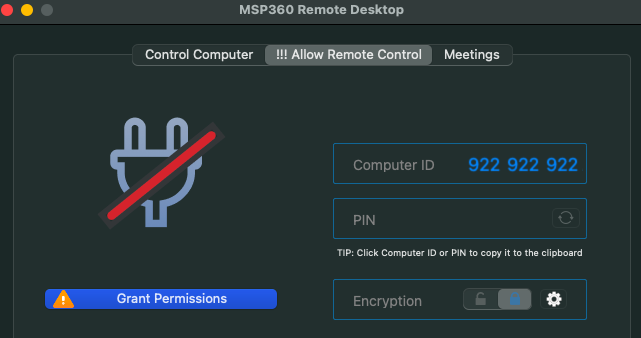
Grant Permissions
To grant required permissions, on the !!! Allow Remote Control tab click Grant Permissions.
The following permissions are required:
- Screen Recording. This permission allows Connect to share the remote computer screen. Click Open Screen Recording Settings and allow screen sharing for Connect.
- Accessibility. This permission allows Connect to send keyboard (keystrokes) / mouse inputs from the local computer to the remote one. Click Open Accessibility Settings to grant this permission
Once you are done with granting permissions, click Close. It is recommended to quit MSP360 Connect and restart it to apply these changes.
Ready to connect status appears on the Allow Remote Control tab. Now you can start configuring upcoming connection preferences on the remote computer.
Allow Upcoming Connections
To allow upcoming connections on the remote computer click gear icon on the !!! Allow Remote Control tab.
On Preferences > Connections allow incoming connection to this computer.
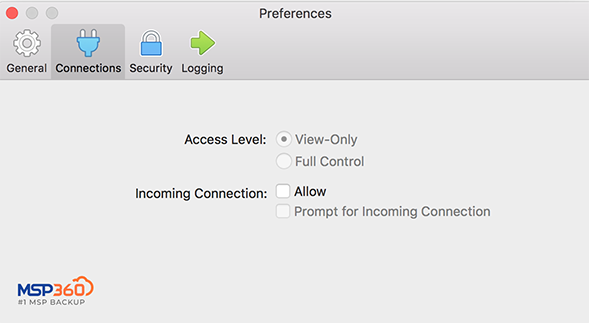
Configure preferences as described in Preferences.
Connect allows either view only or full control connections.
Connect to Remote Computer
Now the remote computer is ready for the upcoming connection.
In the middle of the !!! Allow Remote Control tab, copy two parameters of the remote computer required for establishing the connection: Computer ID and PIN. The remote user should share them with the person authorized to connect to the remote computer.
When they receive your ID and PIN, they can instantly connect to the remote computer by first specifying the computer ID and clicking Connect:
The remote user will immediately be prompted to permit the connection. Connect enables either view only or full control connection. If the remote user doesn't want to share the entire screen, it is possible to share only a specific application.
The other side needs to enter PIN, then click the arrow button.
Shortly after the other side will be able to view or control your PC depending on the permissions you granted.
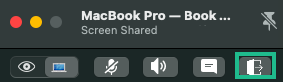
The remote user can manage the established connection by the connection management control

The remote user can stop the connection, if necessary, by clicking disconnection icon on connection management control.
If sleep mode starts on the computer, the connection will be terminated automatically.
Initial Configuration on Computer Running Windows
The Connect for Windows instance on the remote computer running Windows should be configured as described in MSP360 Connect for Windows documentation.

Connect to Remote Computer
Now the remote computer is ready for upcoming connection.
Click Allow Remote Control, copy two parameters of the remote computer required for establishing a connection: Computer ID and PIN. The remote user should share them with the person authorized to connect to the remote computer.
When they receive your ID and PIN, they can instantly connect to the remote computer by first specifying the computer ID and clicking Connect:
The remote user will immediately be prompted to permit the connection. Connect enables either view only or full control connection. If the remote user doesn't want to share the entire screen, it is possible to share only a specific application.
The other side needs to enter PIN, then click the arrow button.
Shortly after the other side will be able to view or control your PC depending on the permissions you granted.
The remote user can stop the connection, if necessary, by clicking disconnection icon on connection management control.
If sleep mode starts on the computer, the connection will be terminated automatically.