Multifactor Authentication (MFA) Protection
Use strong multifactor authentication (MFA) to protect your file versions from unauthorized/accidental deletion. This feature is supported in trial or commercial product editions only.
This chapter covers the following topics:
- Enable MFA Protection for Bucket (AWS)
- Enable MFA Protection for Bucket (Wasabi)
- Configure Storage Account in CloudBerry Explorer to Support MFA
- Disable MFA Protection
Enable MFA Protection for Bucket (AWS)
To enable MFA protection for your bucket, perform the following:
- Enable Virtual MFA for AWS Console
- Prepare Virtual MFA Device
- Configure Storage Account in CloudBerry Explorer to Support MFA
- Enable Versioning and MFA Delete for Your Own Bucket
Required Permissions
To manage virtual MFA devices for your IAM user, you must have the permissions from the following policy: AWS: Allows MFA-authenticated IAM users to manage their own MFA device on the My Security Credentials page. You will need a virtual or hardware device to generate MFA to obtain a token code for MFA to confirm deletion of file version.
Enable Virtual MFA for AWS Console
You can use a phone or other device as a virtual multi-factor authentication (MFA) device. This device should be compliant with RFC 6238, a standards-based TOTP (time-based one-time password) algorithm. The same app can be used for multiple AWS accounts or users. For example, you can use Google Authenticator:
Prepare Virtual MFA Device
Sign in to the AWS Management Console and open the IAM console at https://console.aws.amazon.com/iam/.
In the navigation pane, click Users.
In the User Name list, select desired MFA user.
On the Security credentials scroll down to Multi-factor authentication (MFA), and then click Assign MFA device.
In the Manage MFA Device wizard, click Virtual MFA device, and then click Continue. IAM generates and displays configuration information for the virtual MFA device, including a QR code.
Open your virtual MFA app on your device. For a list of apps that you can use for hosting virtual MFA devices, see Multi-Factor Authentication. If the virtual MFA app supports multiple virtual MFA devices or accounts, select the option to create a new virtual MFA device or account.
Check whether the MFA app supports QR codes, and then do one of the following:
From the wizard, choose Show QR code, and then use the app to scan the QR code.
In the Manage MFA Device wizard, choose Show secret key, and then type the secret key into your MFA app.
Once you are finished, the virtual MFA device starts generating one-time 6-digit codes.
In the Manage MFA Device wizard, in the MFA code 1 box, type the one-time password that currently appears in the virtual MFA device. Wait up to 30 seconds for the device to generate a new one-time password. Then type the second one-time password into the MFA code 2 box. Click Assign MFA.
Submit your request immediately after generating the codes. If you generate the codes and then wait too long to submit the request, the MFA device successfully associates with the user but the MFA device is out of sync. This happens because time-based one-time passwords (TOTP) expire after a short period of time. If this happens, you can resync the device.
The virtual MFA device is now ready for use with AWS. On the Security credentials scroll down to Multi-factor authentication (MFA) and copy the MFA device serial number. You will need this number to enable MFA support in CloudBerry Explorer.

For details on how to replace a virtual MFA device refer to AWS documentation or to Wasabi documentation.
Enable MFA Protection for Bucket (Wasabi)
Configure a virtual MFA device as described in Wasabi Documentation. With configured virtual MFA device you can proceed to the next steps and enable versioning and MFA Delete for your Wasabi bucket with Cloudberry Explorer.
Configure Storage Account in CloudBerry Explorer to Support MFA
Add or configure the storage account for the bucket you want to protect.
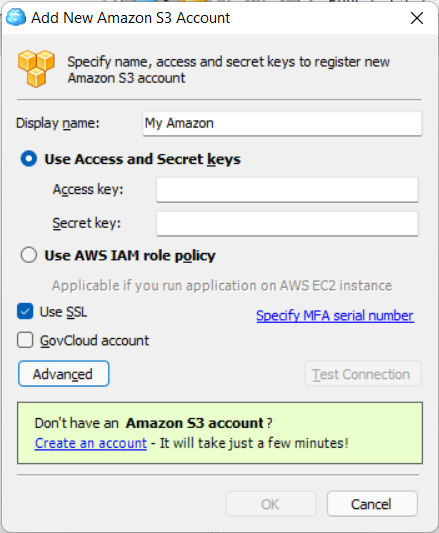
To add a new storage account, proceed as follows:
- In CloudBerry Explorer File menu, select Add New Account. MFA is supported for Amazon S3 and Wasabi storage accounts
- Provide the required credentials.

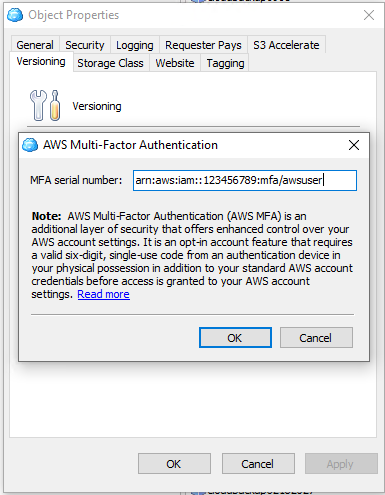
For Amazon S3 specify MFA Device Serial Number. This action is not necessary for Wasabi.
Click Advanced to specify additional parameters for Amazon S3, the following are available:
- Primary Region. The AWS region for the storage account.
- Session token. The session token if authentication is executed via temporary access and secret keys.
Click Test Connection to make sure all credentials are specified properly. The connection test result is displayed shortly.
Once you are done with credentials and settings, click OK.
You can add a new storage account straight from the file manager. In the right or left panel, open the drop-down menu to the top, then select New Storage Account

To edit existing storage account, proceed as follows:
- In CloudBerry Explorer File menu, select Edit Accounts.
- Select the required storage account.
- Click Edit.
- For AWS storage account specify MFA Device Serial Number. This action is not necessary for Wasabi.
- Click Test Connection to make sure all credentials are specified properly. The connection test result is displayed shortly.
- Once you are done with credentials and settings, click OK.
Enable Versioning and MFA Delete for Your Own Bucket
To protect file versions from deletion, the bucket you use should be versioning-enabled and MFA Delete should be enabled for this bucket. You can enable versioning and MFA Delete in CloudBerry Explorer. To enable versioning and MFA Delete for your bucket perform the following steps:
- In CloudBerry Explorer open a source containing a bucket you want to protect (you must be an owner of this bucket).
- Right-click the bucket and select Properties.
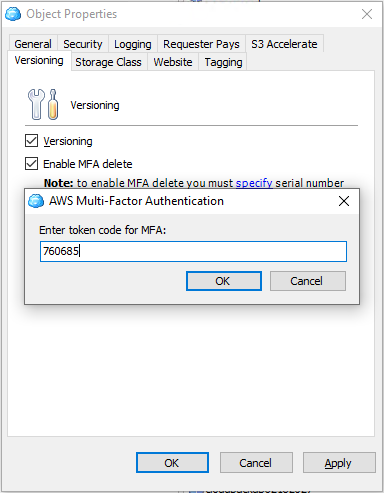
- On Versioning tab select Versioning check box.
- For AWS is required to specify in the note the MFA device serial number to enable MFA Delete

- Select Enable MFA delete check box. Click Apply.
- Confirm this action with 6-digit code from your authenticator app.

MFA protection support is configured for this bucket. Now you will need to provide 6-digit code from your authenticator app to delete file versions. If the provided code is invalid, file version will not be deleted.
In case the MFA Device is replaced, you will need to edit the storage account to provide a new MFA device serial number.
Consider, there are some restrictions, you cannot delete more than 1000 versions of files at a time.
Disable MFA Protection
To disable MFA protection for the storage account, proceed as follows:
- In the File menu, select Edit Accounts.
- Select the required storage account.
- Click Edit.
- Click MFA Serial Number to clear it. Click OK.
- Click OK.